

How To Install Building Paper Nz
Wallpapering is a pop mode of achieving dissimilar textural and patterned effects to add character to rooms. The ever-increasing variety of wallpaper textures, patterns and colourways makes it easy to add together a new element into your home. As with most projects, it pays to know what you lot're doing earlier you kickoff. A quick guide for wallpapering follows – check with Resene ColorShop staff if you need any more information before you kickoff the work.
Papering checklist
You will need: saucepan, ladder, layout brush, paper smoother, pater tiger stripper, paste castor, plumb bob, scissors, size, snap pocketknife, sponge, stripping knife, sugar lather, trim guide, wallpaper paste, wallpaper trough.
Preparing your wall
As with painting, it is important to get the surface preparation correct to ensure your finished handiwork looks its best for as long every bit possible. If you are planning to paint areas such as ceiling, joinery and trim, exercise this work first to avert damaging whatever new wallpaper. Pigment the highest areas first, such as the ceiling, then work your mode down to windows, doors and then finish with the flooring and skirting boards.
-
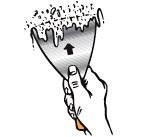
If the walls are already wallpapered, all existing wallpaper must be removed. Wet the walls with Metylan Wallpaper Remover to soften the wallpaper. Start wetting from the bottom and work up. Let the water soak into the paper and practice the work. Don't rush.
-
When all the wallpaper has been removed permit the wall surface to dry completely, and then sand with 100 grit aloe sandpaper to remove all nibs etc. and dust the walls. Fill all imperfections with a sandable filler, sand smooth and dust the unabridged surface then size earlier hanging your new wallpaper.
-
If your walls have been painted with an enamel (loftier gloss) pigment such as in kitchens, bathrooms and then on, wash the unabridged surface with carbohydrate soap then rinse with clean h2o. When dry sand the unabridged surface with lxxx grit aloe sandpaper to requite a good grip or key for your size and paste to adhere to. Dust the entire surface to remove all dust particles, size the walls, and then hang your wallpaper.
Treat all areas of mould with Resene Moss & Mould Killer. Place the source of the dampness and fix to preclude whatever reoccurrence.
-
Sand new paperfaced plasterboard with 100 dust sandpaper to remove any nibs and so on, dust completely and apply two coats of size to allow for improve slip and slide when hanging your wallpaper.
-
Sand yellowed or water soluble stained paperfaced plasterboard with 100 grit sandpaper, dust the entire surface and apply a coat of Resene Sureseal pigmented sealer. Go out as long equally possible for the sealer to cure, and so sand the entire surface with fourscore grit sandpaper to give a practiced key for your size and paste to attach to. Dust the entire surface to remove all grit particles and size the full wall area before hanging your wallpaper.
-
Latex size may simply exist used under paper backed products.

Paint the trim offset to avert damaging the new wallpaper

Use Sugar Lather to clean the painted surfaces
Remove flaking or peeling paint

Fill whatever holes with a plaster filler
Glaze the walls with wall size to give a better surface
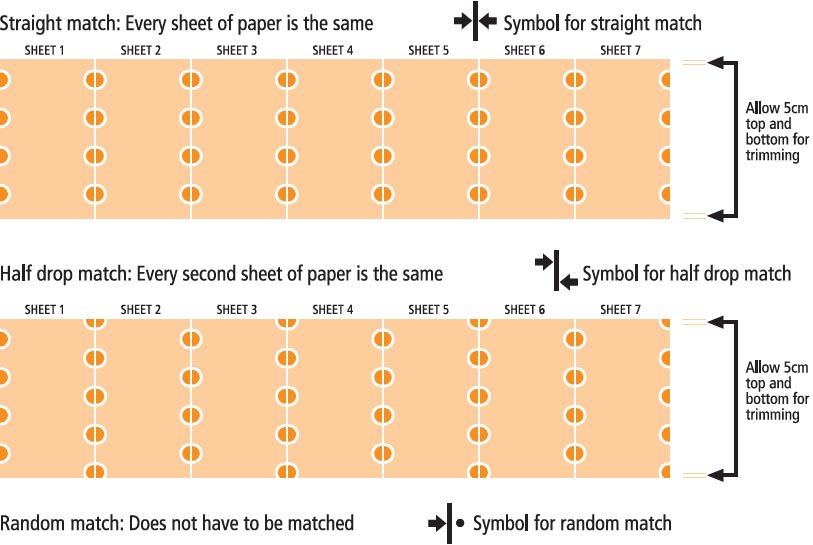
Measuring, cutting and matching
Measure the altitude from skirting to ceiling and add 5cm height and lesser for trimming. Cut your first strip at this measurement. This is your template from which all your paper tin can be matched and cut. Mark on the height dorsum of this strip (1) with a pencil to identify the strip and top. The elevation of wallpaper is always as it unrolls off the uncut gyre. Use this first strip to match and cut the second strip, number this (2) at the top and continue this process. Keep the strips in order and so that the pattern tin be matched on the wall.
First strip on each wall
A plumbline must be used to hang your first length of newspaper perfectly straight. Measure the width of the paper you are going to hang. Mensurate this amount out from the corner (in the direction you are going) less 15mm. Put a mark close to the ceiling at this point. This is where y'all hang your plumbline from and will allow a 15mm overlap around the corner. Marking downwards the plumb line every 300/400 mm. This will give you a good vertical line to hang your first length to.
Where to start

Soaking/pasting/hanging
Follow the pasting/soaking instructions on the wallpaper as these practice differ from wallpaper to wallpaper. Some are supplied pasted, some unpasted. Prepasted and unpasted wallpapers need to exist soaked so they tin can relax and expand before existence hung. This process cannot be rushed, and so accept your time.
Hang the first strip in line with your plumbline
Prepasted wallpaper
Loosely coil your cut lengths from the bottom with the pattern on the inside. Fill the water trough approximately two thirds full with lukewarm water. Immerse the rerolled length into the water trough, making sure the entire length is fully immersed for the required fourth dimension (approx 15 seconds). Feed the leading border of the paper under the wire in the trough and pull up slowly. Wet a strip across the dorsum of the paper to test for the presence of paste earlier wetting. If only a small corporeality of paste is detected treat the wallpaper as unpasted. Ensure that all the paste on the back of the paper is fully wetted. Place the wetted newspaper on the wall and leave for three minutes to fully relax and aggrandize before final placement. Trim and echo this procedure following the instructions on the wallpaper characterization.
Unpasted wallpaper
About unpasted wallpapers are imported and require pasting and a longer soaking and relax time earlier hanging. Mix the recommended paste to the correct consistency indicated on the paste'south packaging and exit for the required time (approximately 15 minutes) before using. Place the cutting newspaper on a table or flat work surface, pattern side down. Paste the dorsum of the paper with a good amount of paste, making sure that the paste has been applied right to the edges. Fold the paper, paste to paste, with a small fold at the bottom and a big fold at the top. Leave the paper to relax before hanging, between 7-10 minutes. Some products may require up to 20 minutes to fully relax before they are set for hanging.
To hang, unfold the top section of the length and place it onto the wall in line with the plumb line. Smooth out with a castor starting from the centre of the length out to the edges, so unfold the bottom section and smoothen out in the same way. Trim and echo this procedure for the next strip.
Carefully read and follow the manufacturer's instructions on the wallpaper characterization.
Hanging your paper
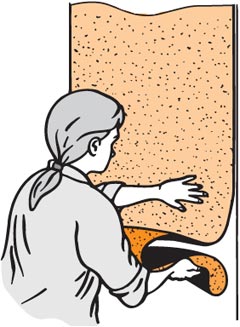
Always strike a new vertical line on each wall. Apply a wallpaper smoothing castor or smoother to apply the wallpaper to the wall. Move from the centre of your length to the edges, pushing whatsoever bubbling away every bit you go. If the paper creases or wrinkles, carefully pull the paper from the bottom past the crease and slowly polish back into place and trim. Don't rush.
Apply a straight edge and a precipitous knife when trimming excess.
In one case the wallpaper is in place, trim the backlog wallpaper at the pinnacle and bottom of the wall. Use a sharp snap off blade knife and directly edge to make the cuts. Push the newspaper into the ceiling line and skirting. A putty knife is useful to scribe the paper into position. Place your directly border upwards against the ceiling and trim along the edge of the straight edge then repeat at the skirting. Remember to remove all excess paste from ceiling and skirting. Butt the border of subsequent lengths of wallpaper to the already hung lengths taking care to ensure you match the pattern.
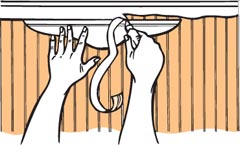
Inside corners should be hung in two pieces. Measure top and lesser from the edge of the last length hung into the corner. Take the largest distance and add 15mm. Transfer this measurement to the length of newspaper to be hung, cut at this measurement and hang. This will allow 15mm to return onto the adjacent wall.
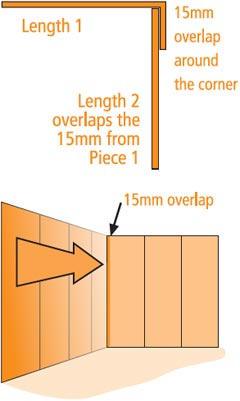
Measure the piece of wallpaper that is left and brand a new vertical line at this measurement from the corner in the direction yous are going. Hang the 2nd length of paper to this plumb line, working from the plumb line back into the corner overlapping the 15mm from the outset length.
In corners where vinyl laps vinyl, employ a special vinyl to vinyl adhesive such every bit Metylan Border Adhesive. Wallpaper will remain workable for approximately 10-xv minutes afterward soaking or pasting, so take your fourth dimension to get the strip into the right position and well smoothed before moving onto the next strip. Always strike a new vertical line on each wall.
To hang around doors and windows information technology is best to hang the full strip of wallpaper so it overlaps the frame and smooth it into place to the edge of the door or window frame. Diagonally cutting the wallpaper to the corners of the door or window frame and so that the wallpaper is lying smoothly against the wall. Trim the excess off around the frame using a straight edged knife.
Switches and powerpoints may be neatly wallpapered by hanging the strip of wallpaper so it covers the unit. Mark the four corners of the switch using a pencil and connect these together to institute the outline. Elevator the paper and using scissors cutting from the eye of the surface area outwards. Working one side at a time, push the flap over the edge of the unit, smooth downwards and trim off excess.
Switch off ability at mains before working around electrical fittings.
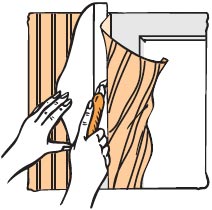
To hang around doors, overlap the full strip,cutting, shine information technology into identify and trim
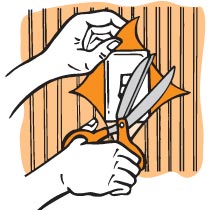
Cover switches and powerpoints and cutting from the center outwards

Make diagonal cuts into the corners when papering around fittings and trim
Paste the wall
A large choice of not-woven wallpaper is now available, which is suitable for the paste the wall method of hanging. But use this method for non-woven papers. Consult your Resene ColorShop earlier you starting time if in incertitude.
Training of the wall remains the same every bit when hanging any wallpaper the traditional mode. Preparation is the most important part of decorating interior walls.
Wallpaper paste
Resene recommend Halls Beeline paste diluted to the instructions on the packet for Paste the Wall product.
The coverage is approximately three litres of mixed paste per 25 metre ringlet. (This equates to 12.5m2 or 5 x 2.4 metre drops of wallpaper).
Pasting the wall
Apply the paste to the wall using a 8mm Dacron roller or brush. Use a brush to become the paste into corners and edges.
Paste the equivalent area of the wall for the number of drops that tin exist hung within x-20 minutes, or simply paste for i drib at a fourth dimension depending on the wall arresting the moisture or drying conditions in general. If the paste dries besides quickly, simply re-paste the wall earlier hanging the side by side drop.
Hanging non-woven wallcoverings
-
Utilise directly from the gyre onto the wall and trim, leaving approximately an extra 5cm on meridian and lesser. The same allowance applies when hanging a pre-cutting strip or drop.
-
Once positioned correctly, shine out from the centre to the edges using a smoother. Smooth out all bubbles and ensure the edges are firmly in contact with the wall. Practise not use a seam roller.
-
Continue the wallcoverings onto the ceiling and skirting so trim any excess at top and bottom with a straight edge and snap-off pocketknife. Utilize a sharp bract at all times to avoid ripping of wallcoverings.
-
Inside corners are rarely true and should be hung in 2 strips. When vinyl overlaps vinyl Shurstik Stick Down adhesive must be used.
-
Always wash downwardly the seams, skirtings and architraves with clean water as you go. No paste balance should be left on the surface of wallcoverings, as this may show upwardly in one case the wallcovering is dry.
-
Contrary hanging: where the wallpaper is textural and not directional or plain, for the all-time result drops should be reverse hung every bit indicated on the label. Reverse every second drop.
Wallpaper Borders
Borders are an optional extra when information technology comes to wallpapering but are often used as a way of adding colour or pattern into a room. Most borders are sold in 5m or 10m lengths.
If planning a horizontal border, decide the height you would like the border to appear at and and then use a level to determine a true horizontal line. Use the level as your guideline to hang the border.
When hanging pasted or unpasted borders over vinyl wallpaper, a vinyl to vinyl adhesive such every bit Shurstik Border Adhesive must be used. Brand sure that all excess adhesive is done off before it dries.
Tips and tricks
-
Whenever the surface you lot are about to wallpaper is discoloured, sunburnt or has h2o soluble stains, utilize a total coat of Resene Sureseal pigmented sealer to the entire surface. Once dry, sand the surface with lxxx grit sandpaper to give a proficient key/grip for your size and paste to stick to. Dust the unabridged surface to remove all dust particles.
-
When stripping wallpaper use a wallpaper stripper such as Metylan Wallpaper Remover. Don't use liquid detergent.
-
Never assume that windows and doors are directly or true or that the elevation is precise all the style around the room. Always mensurate and utilise your plumb line to ensure your wallpaper is hung true and straight.
-
Always allow your wallpaper to dry naturally after hanging. Do not try to bustle the drying process past using a heater. Force drying the wallpaper will cause the joins to open during the drying process. In cold, damp, unventilated weather, drying may take up to 1 calendar week.
-
Modify the water in the trough after every 3 lengths or 10 minutes.
-
Do not use a seam roller and don't employ as well much pressure to the seams or y'all will squeeze out the paste and the edges volition lift.
-
Wipe off excess paste and water after each length. A towel under the water trough is a good idea.
-
It is non necessary or recommended to repaste ready pasted wallpaper.
-
Anaglypta and Paint On wallpaper manufacturer'due south instructions must be carefully followed.
-
Read the instructions on the rear of the wallpaper label earlier starting.
-
Earlier you begin, check your wallpaper curlicue past scroll to ensure that you accept the correct pattern, colour and sufficient quantity of the same lot number.
-
If after hanging three lengths lacking wallpaper is discovered, stop and contact united states.
Learn how to wallpaper with confidence
Wallpaper technology has improved so much that wallpapering is so much easier than you might call back or think it information technology.
Resene Pigment and Decorating Issues Solver
Acquire more about typical painting bug and situations you lot may discover when decorating.
Trouble solver topics Safety topics Ask a Paint Proficient

Source: https://www.resene.co.nz/homeown/how_to_diy/how-to-wallpaper.htm
Posted by: choiwhyall.blogspot.com
0 Response to "How To Install Building Paper Nz"
Post a Comment